Showing posts with label Garlic. Show all posts

Monday, December 8, 2014

Italian Stuffed Artichokes

I hope everyone had a wonderful Thanksgiving and stress free Black Friday. I enjoyed time with my family and ate far too much and then Friday I went to the tree lot and got a gorgeous 8ft tree for my living room. Unfortunately, now it's back to reality. I just gave my two Corgis baths, which was exhausting and near impossible to wrangle those two into the bathroom. Now they are sadly staring at me while being locked up in the kitchen so that they can dry off. As my reward for all my hard work I'm going to eat the last stuffed artichoke I saved.


My all time favorite Thanksgiving food has always been stuffed artichokes. I love them and my grandma makes them every year for big holidays. Unfortunately this year I am 3,000 miles away in California and I had to make them myself. After talking to her many times about the recipe I got it down pat and was able to make them for Thanksgiving.


Ingredients
1 (oz.) Can of Progresso Italian Bread Crumbs
3 Cloves of Garlic
1/2 Cup Grated Parmesan Cheese
1/2 Cup Chopped Fresh Basil
5 Artichokes
Other great things to add to the stuffing: fresh parsley, mushrooms (I would have loved adding some mushrooms but Brian doesn't like them), mozzarella cheese, and/or nuts. 


 Start by cleaning and cutting the artichoke. 

Cut the stem so that it can sit flat in the pot. Cut the points off of all of the leaves. Then rinse the artichoke and bang it upside down so that you get the dirt all the way down at the bottom, it will also open it up so that you can stuff it more. 

In a large bowl mix the bread crumbs, the Parmesan cheese, the garlic cloves, and the basil. 

Add just a bit of olive oil so that the bread crumbs are moist. 

Then spoon into each leaf of the artichoke with a spoon.

Spread the center of the artichoke open and stuff with bread crumbs.

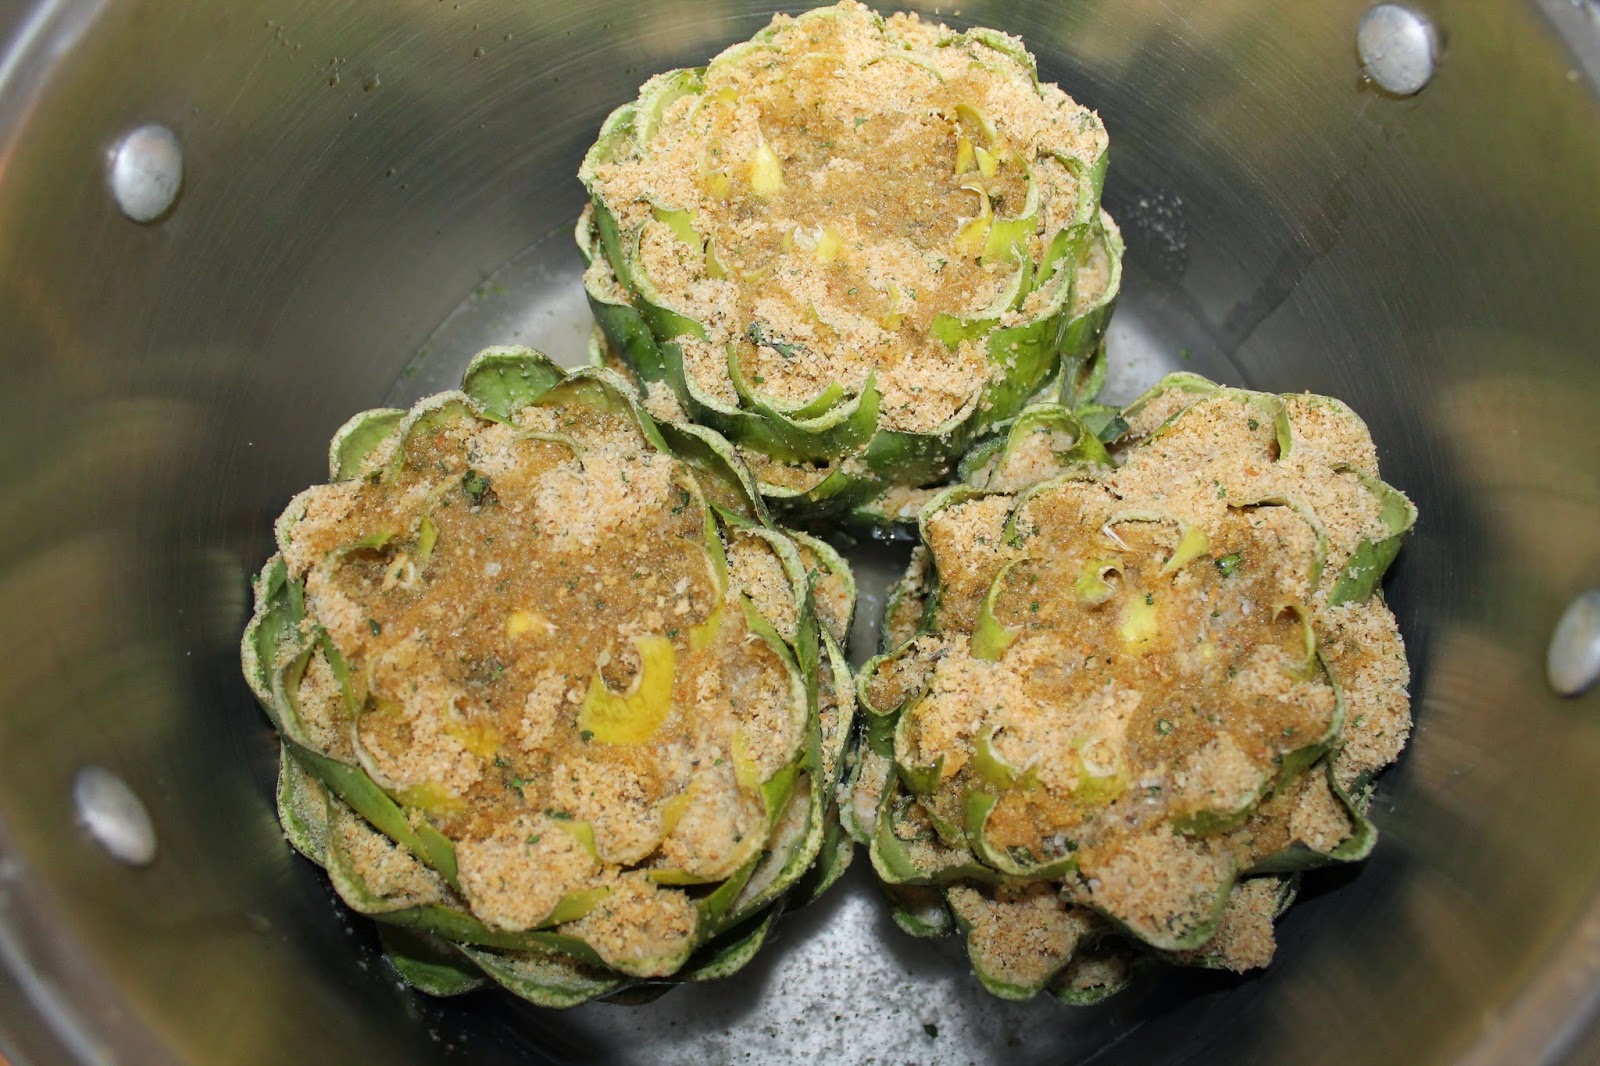
Put the artichokes in a large pasta pot and drizzle with a little olive oil.

Make sure that the pot has about 2-2.5 inches of water (about 1 1/2 cups) at the bottom at all times so that they don't burn. 

Cook for about an hour or until a leaf comes off easily when pulled.

I love stuffed artichokes. When I went to Italy last year artichokes were everywhere my absolute favorite were in the Roman Jewish Ghetto. They were deep fried in Olive oil, and garlic. 

It was heavenly.


Thursday, August 22, 2013

Skinny Zucchini Parmesan


My grandmother is an amazing cook. She's Italian so it's completely natural for her to make amazing food. One of my absolute favorite things she makes is her zucchini parmesan. I'm not sure whether she would applaud me or ring my neck for making one of her classic recipes a lighter. (Especially since I used jarred sauce instead of homemade. Sorry Grammy!). Her zucchini parmesan is delicious, but it's fried. She frys up her zucchini slices in olive oil, which is so very good. But it's so very bad for me. I lightened her recipe up a bit. I also made lighter bread crumbs to coat the zucchini. It was the first time I tried to make this and came out delicious.

Ingredients:
1 Large Zucchini (I used 1 very large one from a neighbors garden, I would probably use 2 is your are using the store bought kind)
4 Slices Sara Lee 45 Calorie Wheat Bread
4 Tbsp Newman's Own Light Italian Dressing
1 Jar Healthy Pasta Sauce (I used Prego Heart Smart)
2 tsp Parmesan Cheese
1/4 Cup Reduced Fat Shredded Mozzarella Cheese 

I started with the breadcrumbs. I laid out the four slices of sandwich bread on a baking sheet and brushed each one with Italian dressing. I popped them in the oven at 350 until they were browned then I flipped them over, brushed the other side with dressing and popped them back in the oven.

Both sides should look like this. Then I crumbled them a bit with my hands and threw them in the blender.

I pulsed it in the blender until it was a crumb consistency. Transfer the crumbs to a bowl and stir in the parmesan cheese.

While the bread was toasting I started to slice up the zucchini. I made them decently large slices.

Time for the conveyor belt method. Beat the egg in one bowl and put it next to the breadcrumbs. Dip each slice of zucchini in the egg, shake off any excess, then dip in the breadcrumbs. 

Place the breaded zucchini slices in a hot pan sprayed with PAM Olive Oil. After about 2-3 minutes flip them, very carefully. 

Once both sides have browned and the zucchini is tender. Take them out of the pan and place them on a paper towel to collect any excess oil. 

Now it's time to assemble...

I covered the bottom of a casserole dish with about 1/2 cup of the sauce. Then I placed some of the zucchini slices over it. ( I ran out of breadcrumbs for the last 2 slices of zucchini so I just fried them up with salt and pepper and stuck them on the bottom. No one will ever know the difference.)

Continue to layer sauce and zucchini slices about 3 times or until zucchini is gone, depending on the size of your casserole dish. Then sprinkle the mozzarella cheese over the top. 

Cover and place in a 400 degree preheated oven. Bake for 15-20 minutes, remove lid and bake for an additional 5 minutes or until cheese is melted and bubbly. 

I may have been too excited to eat this that I completely forgot to take a picture of it on my plate. I enjoyed it with a salad and it was a wonderful dinner. 


What is your absolute favorite thing your grandmother makes?


Nutrition Facts
Serving Size 1/2 cup (1/6 of recipe)
Amount Per Serving
Calories
185
Calories from Fat
71
% Daily Value*
Total Fat
7.9g
12%
Saturated Fat
1.7g
9%
Trans Fat
0.0g
Cholesterol
30mg
10%
Sodium
650mg
27%
Total Carbohydrates
23.6g
8%
Dietary Fiber
5.9g
24%
Sugars
13.9g
Protein
7.8g
Vitamin A 16%Vitamin C 35%
Calcium 10%Iron 9%
Nutrition Grade B+
* Based on a 2000 calorie diet

Wednesday, April 10, 2013

Baked Spaghetti Squash

Are you ready for a really super duper yummy recipe? 
I mean this is crazy good and only 102 calories a serving. 
To be honest I was a bit skeptical about how it would taste. I mean I've never really had spaghetti squash before and I thought it might taste like squash. Boy, was I wrong. I think it's better than regular spaghetti and I think I may have converted to spaghetti squash for good. 

I really love healthy food swaps that taste better than the original. I feel better about myself for eating something healthy but I also feel satisfied that I'm eating something that I love. 


Ingredients:

1 large spaghetti squash (makes about 6 cups)
1 jar Classico Tomato & Basil Pasta Sauce
1 red pepper
1 green pepper
1 clove garlic
1/2 white onion
1 tbsp fresh basil
1 tbsp fresh parsley
1 tbsp fresh chives
1/4 cup Shredded Mozzarella Cheese 


Stab the spaghetti squash a couple times with a fork and place in the microwave for 6 minutes. Flip the squash over and microwave for another 6 minutes. Continue to do this until the squash is slightly soft.

While the squash is in the microwave, slice up the peppers, onions, and garlic and toss in a pan sprayed with cooking spray. 

Cook them covered on medium heat until they are soft and the whole house smells wonderful. 

Turn down the heat and toss in the herbs. This is totally up to your preference as to which herbs to add. I just added what I have growing on my little patio garden. 


As soon as the squash is a bit soft you can remove it from the microwave and let it cool down. 
Slice the squash in half and scoop out the seeds and guts from the middle. 
Once the squash is cleaned out you can begin to scrap for the spaghetti. Take a spoon and carefully scrap downward and towards the center. 
After I had scooped out the whole squash I went through the bowl and detangled the spaghetti. Any pieces that were stuck together or clumped into one I broke apart. 

Now I have a big bowl of spaghetti and my sauce. I used Classico Tomato & Basil because I was just too lazy to make my own sauce. 

Pour the sauce and the peppers and onions mix over the top of the spaghetti squash.

Stir it all up until everybody is coated in sauce. 
(This is making me so hungry right now. Doesn't that look so good?)

Top it off with 1/4 of a cup of shredded mozzarella. 

 Cover and pop into a preheated 450 degree F oven for 10 minutes. 
Uncover and bake for another 5 minutes or until the cheese is melty and bubbly. 


This recipe makes about 6 one cup servings. 


I am totally in love with this.

What are some other really great healthy swaps that you use?


Nutrition Facts
Serving Size 1 Cup 
Amount Per Serving
Calories 102
Calories from Fat 22
% Daily Value*
Total Fat 2.4g
4%
Saturated Fat 0.7g
4%
Trans Fat 0.0g
Cholesterol 3mg
1%
Sodium 361mg
15%
Total Carbohydrates 17.9g
6%
Dietary Fiber 1.8g
7%
Sugars 5.9g
Protein 4.1g
Vitamin A 27%Vitamin C 79%
Calcium 10%Iron 8%
Nutrition Grade A-
* Based on a 2000 calorie diet

Wednesday, March 6, 2013

Take a hike with Garlic Parmesan Roasted Chickpeas

Typically, I spend my Saturdays out shopping. This past weekend, in and effort to be more active, my mom and I decided to go for a hike. Don't get me wrong, shopping is my favorite cardio but we wanted to do something that's a higher calorie burner. Plus, I got to take the puppy!

Bella loves going for hikes.

What's a hike without a great healthy snack? We brought along a few apples and oranges and I also made Oven Roasted Garlic Parmesan Chickpeas. They were delicious! I was a little apprehensive when I first heard of Oven Roasted Chickpeas. I just didn't think they could turn out very well but I was happily surprised when they came out of the oven and absolutely rocked.


Ingredients: 
1 Can of Garbanzo Beans (AKA Chickpeas)
1 Tbsp Olive Oil
1 Tsp Parmesan Cheese
1 Tsp Garlic Powder
Salt & Pepper

Rinse the garbanzo beans and let them dry a bit. While they are drying, preheat oven to 400 degrees F.

Drizzle the Olive Oil over the Garbanzo Beans and shake to make sure they are all evenly coated.

Throw on the Parmesan, Garlic Powder, Salt & Pepper. Toss again to evenly coat all the Chickpeas.

Pour the seasoned Chickpeas on a baking sheet and place in a the preheated oven. 
Bake for about 15 minutes then toss them and bake for an additional 15 minutes. 

Remove from the oven once they are crisp and golden. To make them extra crunchy turn on the broiler for 3-5 minutes but watch them like a hawk to avoid burning.

    Servings Per 1/2 Cup
Nutrition Facts
Serving Size 129 g
Amount Per Serving
Calories 152                    Calories from Fat 52
% Daily Value*
Total Fat
5.8g
9%
Saturated Fat
0.7g
4%
Trans Fat
0.0g
Cholesterol
1mg
0%
Sodium
380mg
16%
Total Carbohydrates
18.6g
6%
Dietary Fiber
5.2g
21%
Sugars
1.5g
Protein
6.8g
Vitamin A 0%Vitamin C 1%
Calcium 10%Iron 9%
Nutrition Grade B-
* Based on a 2000 calorie diet


What do ya'll like to bring with you on a hike? 


Click here for the Printable Recipe